Quantcast
Channel: ConfigMgr – Mike's Tech Blog
Viewing all 78 articles
Browse latest View live

AZ Systems Management User Group presents: Kent Agerlund and Mike Terrill

$
0
0

We are planning on having our fifth meeting of 2014.  This meeting will be held at ***Interface Technical Training***: 3110 North Central Avenue, Suite 160, Phoenix, AZ 85012, September 11th . The meeting will start at **5:00 PM** with the welcome time at 4:30 PM-come early and socialize a bit.

Kent and Mike will be presenting on the following:

Compliance – the new orange in Enterprise Client Management

Never before have we been looking at the same amount of challenges in terms ensuring compliance among all our clients. Forget about the days where managing compliance was a question of implementing the correct group policy: The challenges of today and tomorrow are different as the types of devices become more diverse. This session will teach you how you can use Settings Management to ensure compliance on your Windows devices, Mac OSx devices and mobile devices. We will also look into how you can use Settings Management modify registry settings, deploy software and much more.

Kent Agerlund, Coretech Co-Founder and evangelist

In 1999 Kent Agerlund, co-founded Coretech. The company growth is heavily fueled by Kent´s own enthusiasm and determination to constantly strive for the highest possible expert knowledge in the System Center suite.  Kent’s enormous experiences as an instructor are recognized world-wide by delegates attending his courses. His rare ability to combine hands-on know-how with deep and detailed knowledge of Configuration Manager, which he has worked with since 1996, as well as advanced infrastructure makes Kent one of the most sought after expert instructors in the world.

Mike Terrill, Product Manager at 1E

Mike is the Windows Migration and User-centric Application Management Product Manager at 1E.  He specializes in the design, architecture and installation of Configuration Manager and Windows operating system deployments.  Prior to joining 1E in 2007, he worked 10 years for a global strategic outsourcing company as an IT Architect specializing in SMS, software distribution and operating system deployment.  His most recent project included deploying System Center 2012 Configuration Manager and Windows 7 to a 450K seat environment.  He founded and runs the Arizona Systems Management User Group and has been working with SMS since version 1.2.

Registration Link:

https://clicktoattend.microsoft.com/en-us/Pages/EventDetails.aspx?EventID=197840

Thanks,
Mike Terrill
AZ Systems Management User Group

 MMS486x60


ConfigMgr 2012: Always including certain files in your Boot Images

$
0
0

Back in the ConfigMgr 2007 days, I wrote a similar blog called ConfigMgr OSD: Always including certain files in your Boot Images -think Trace32.  I figured it was time to create a similar one for ConfigMgr 2012 since some things have changed.  Even though CMTrace is now included in the boot image by default, there are still a few other utilities that I find useful to inject.  Plus, I do not like the fact that CMTrace is not in the path and you have to locate it in order to launch it (i.e. more typing from a command prompt).  Other things like your company’s background image is also nice to include as well.

After making the following changes, any time a boot image is generated (regardless of who does it), the files that you want will always be there.  First, on the Primary Site server, locate a file called osdinjection.xml and open it with Notepad (or your favorite editor).  It will be located in the ConfigMgr installation directory\bin\x64.  This file controls which files get injected into the WinPE Boot Images.  There is a section for each platform.  However, the two common platforms are x86 <Architecture imgArch=”i386”> and x64 <Architecture imgArch=”x64”>.  Underneath each of these sections, there will be a section for WPE, WDT and SCCM.  I add my additions under the SCCM section.  So, for including CMTrace in the Windows\System32 directory, you would add the following under the i386-SCCM section:

<File name="CMTrace.exe">
<LocaleNeeded>false</LocaleNeeded>
<Source>bin\i386</Source>
<Destination>Windows\System32</Destination>
</File>

Make sure to include it before the closing file list tag </Filelist> and save the file.  Also, it is a good idea to make a backup of this file before editing it just in case something happens to the formatting or a tag accidentally gets deleted.  If the file gets corrupt, then all future Boot Images creations will fail. For the x64 boot image, add the following under the x64-SCCM section:

<File name="CMTrace.exe">
<LocaleNeeded>false</LocaleNeeded>
<Source>bin\x64</Source>
<Destination>Windows\System32</Destination>
</File>

Since both architectures of CMTrace.exe are already in the source file locations there is nothing else that needs to be done for these files.  Keep in mind for x64 Boot Images; you will need to use x64 executable files since there is not a WOW 32 bit subsystem in WinPE x64.

Let say you want to increase the log size and history from the default for bare metal builds to 5 MB and 5 roll over logs.  Using Notepad, create a file called smsts.ini with the following contents:

[Logging]
LogMaxSize=5242880
LogMaxHistory=5

Save the file in the ConfigMgr installation directory\OSD\bin\i386. Next, we need to update both the i386 and x64 SCCM sections with the following:

Place the following under both the imgArch=”i386″ and imgArch=”x64″, SCCM sections:

<File name="smsts.ini">
<Destination>Windows</Destination>
<LocaleNeeded>false</LocaleNeeded>
<Source>sms\bin\i386</Source>
</File>

Since the ini file is not platform specific, we can use the same file in both boot images and do not need to create two separate files.

If you always want to include your company’s background image in your boot images, simply rename it to winpe.jpg and copy it (replacing the existing winpe.jpg) into the ConfigMgr installation directory\OSD\bin\i386 directory.  Future upgrades and service packs may over write these files (including osdinjection.xml), so be sure to add it to your upgrade testing check list.

Add any other scripts, tools or utilities to your boot images using the above process (as long as they do not change frequently).  This prevents the need for having a reference package for WinPE stages.  It is best if they are small in size, otherwise your boot images will balloon in size.

Originally posted on http://miketerrill.net/


ConfigMgr 2012 OSD: Automatically Open SMSTS log

$
0
0

I was doing an OSD project about 5 years ago when I came up with the idea of automatically opening the smsts.log file using Trace32 (now replaced by CMTrace).  I am always up for a challenge to see if something can be done, so I set out to see if I could make it happen.  By automatically opening the smsts.log, I could save a ton of time during the development and testing phase of engineering the task sequence.

Back in the ConfigMgr 2007 days, you would have to hit F8 in order to bring up the command prompt and then hopefully you remembered to put the Trace32 on the boot image for the WinPE phases.  Now in CM12, CMTrace is included in the boot image, however, it is not in the path (see my other post called ConfigMgr 2012: Always including certain files in your Boot Images for a little trick to put CMTrace in the System32 directory so that it is in the path and can be launched from any directory).  After you launch the log viewer for the first time, the first thing it does is ask you if you want to make it the default log viewer before it will continue.  Setting a couple of registry keys ahead of time is all that it takes to prevent this from being displayed.

After that, it is a matter of launching the log viewer and calling smsts.log.  There are two things to consider for this action: 1. Depending on the scenario (i.e. new computer or refresh), you need to know how to launch CMTrace and 2. Depending on the scenario and place in the task sequence, you need to know where the smsts.log is located.  For #1, you can launch CMTrace directly if you are in WinPE or the newly installed OS during State Restore.  If starting from a currently installed OS (i.e. refresh scenario), then you need to use a utility from the MDT Toolkit called ServiceUI.exe in order to make CMTrace visible.  For #2, the smsts.log file starts in different locations based on the scenario and it also moves around during the task sequence.

With that said, let’s take a look at the steps that need to get inserted into a ConfigMgr R2-MDT client task sequence:

01 OSD-Debug

Each *DEBUG* Group has a condition on the Task Sequence Variable DEBUG (DEBUG equals “TRUE”).  This variable can be set on a Collection or System Resource.

Set OS Target Architecture: this step is used to set the architecture of the OS that is being applied.  For an example, use the value x64 if the new OS being installed is Windows 8.1 Enterprise x64.  This is used later in order to copy the correct architecture version of CMTrace and ServiceUI onto the target OS.

Use Toolkit Package and Gather: This step is used to obtain CMTrace (which needs to be copied into the MDT Toolkit Package) and ServiceUI utilities, and also determine the current architecture under the refresh scenario.

Copy CMTrace: This step is also used in the refresh scenario and is used to copy the correct architecture version of CMTrace into System32 (which minimizes the number of registry setting steps).

Set Default Log Viewer HKCU: These three steps set the necessary registry keys in order to prevent CMTrace from prompting to be the default log viewer.  Yes, they could be done via a script with a package or a very long command line, but I kept them split out and in Run Command Line steps for simplicity.

Open SMSTS Log-NEWCOMPUTER: This step opens the smsts.log in a new computer scenario using the following command: cmd /c “start x:\Windows\System32\CMTrace.exe x:\Windows\Temp\SMSTSLog\smsts.log”

Open SMSTS Log-REFRESH: This step opens the smsts.log in a refresh scenario using the following command: “%deployroot%\tools\%architecture%\ServiceUI.exe” -process:tsprogressui.exe -nowait %WINDIR%\System32\CMTrace.exe %_SMSTSLogPath%\smsts.log

Each time the task sequence boots into a new OS, the above registry entries need to be set.  The following screen shots show each of the phases below:

Refresh scenario booting into WinPE:

02 OSD-Debug

Copying CMTrace and ServiceUI into the new OS and then rebooting into the target OS:

03 OSD-Debug

Closing CMTrace at the end of the task sequence:

04 OSD-Debug

In summary, here are the steps for getting this up and running in your environment.  This assumes that you already have MDT integrated with ConfigMgr 2012 R2:

1. Add both the x86 and x64 version of CMTrace.exe to your MDT Toolkit Package.  They can be found in ConfigMgr install directory\OSD\bin\i386 and ConfigMgr install directory\OSD\bin\x64.  In the MDT Toolkit Package place the x86 version in .\Tools\x86 and the x64 version in .\Tools\x64.  Be sure to update your Distribution Points after adding the files.

2. Download the Client Task Sequence – DEBUG.xml and copy it into the SCCM directory where the Microsoft Deployment Toolkit is installed (i.e. C:\Program Files\Microsoft Deployment Toolkit\SCCM).

3. Use the Create MDT Task Sequence action and select Client Task Sequence – DEBUG in the Choose Template drop down.  Complete the wizard and edit the newly created task sequence.  Select the step Set OS Target Architecture and edit the value to reflect the architecture of the WIM that is being deployed.

4. Create a Deployment and target a Collection.

5. On the targeted Collection, create a variable called DEBUG and set the value to TRUE.  Add some test machines, start a deployment and watch the smsts.log open automatically!

Originally posted on http://miketerrill.net/


ConfigMgr 2012 R2 OSD: Create Your Own TS Templates

$
0
0

If you spend a lot of time creating ConfigMgr 2012 R2 OSD Task Sequences, you probably have a method for inserting the steps and groups that you like to use in every TS you create.  Maybe you open a reference TS up and copy and paste steps into a new TS that you are creating.  Maybe you export and import your favorite task sequences or just right-click on one and copy it in the console.  Wouldn’t it be great if you could just create a template of your favorite task sequences and be able to pick them when running through the Create MDT Task Sequence wizard?  Yeah – I was thinking the same thing one day and decided to see if I could do it.

A ConfigMgr Task Sequence is stored in XML.  If you use the Get-CMTaskSequence PowerShell cmdlet, you will notice one of the properties is Sequence.  This is what gets displayed (and updated) when you use the Task Sequence editor.  So, all you need to do is the following:

  1. Build a TS the way you like it
  2. Export the TS XML
  3. Modify it slightly
  4. Copy it into the MDT directory
  5. Test it by using the Create MDT Task Sequence wizard

For step #1, depending on the steps that you add in the task sequence, you might need to clean them up a bit.  For example, if you have a reference package in a step, you might disable the step if you plan on using the template in another ConfigMgr site.  Do the same for anything that is unique or you do not want shared.  In these cases, there might be minor edits that need to be made to the task sequence after running through the Create MDT Task Sequence wizard.  The benefit is the time saving and all of the groups and steps are in the correct order in the task sequence.

For step #2, export the (XML) contents of Sequence property.  If you just dump that value, the XML will be unformatted and if you are like me, that will drive you crazy.  With a little help from PowerShell (and my good friend Kaido @ Coretech for the proper syntax), we can dump this to a file all nicely formatted.  In my previous post, ConfigMgr 2012 OSD: Automatically Open SMSTS log, I included a template that could be used.  I will use this as my example.  The name of the task sequence that I created as a reference is called Standard OS Deployment MDT-DEBUG.  I want to export the XML to a file called Client Task Sequence – DEBUG.xml.  I accomplished this by using the following:

	$TS = Get-CMTaskSequence -Name 'Standard OS Deployment MDT-DEBUG'
	[XML]$XML = $TS.Sequence
	$XML.Save('e:\1E Demo\Client Task Sequence - DEBUG.xml')

For step #3, there are just a few things that need to be done in order to make it usable with the Create MDT Task Sequence wizard.  Add the following to the beginning of the XML:

<?xml version="1.0"?>
<SmsTaskSequencePackage xmlns:xsi="http://www.w3.org/2001/XMLSchema-instance" xmlns:xsd="http://www.w3.org/2001/XMLSchema">
  <BootImageID>CEN00006</BootImageID>
  <Category />
  <DependentProgram />
  <Description />
  <Duration>360</Duration>
  <Name>Client Task Sequence - DEBUG</Name>
  <ProgramFlags>152084496</ProgramFlags>
  <SequenceData>

Be sure to give it the proper name as you want it to show up in the Create MDT Task Sequence wizard drop down box (mine is named Client Task Sequence – DEBUG), and update any other settings you require.  The Boot Image ID will get updated by the one that is selected/created in the wizard, so no need to worry about that field.  The next thing is to add the following to the end of the XML:

  </SequenceData>
  <SourceDate>2014-09-16T16:00:00</SourceDate>
  <SupportedOperatingSystems />
  <IconSize>0</IconSize>
</SmsTaskSequencePackage>

I usually modify the SourceDate as a way of versioning my templates.  (Modifying this manually shows what needs to be done, however, this whole process could be automated using PowerShell.)

For step #4, save the file and copy it into the SCCM directory where the Microsoft Deployment Toolkit is installed (i.e. C:\Program Files\Microsoft Deployment Toolkit\SCCM).

For step #5, create a new task sequence using the Create MDT Task Sequence wizard and you should see your newly created template:

01 Create TS Template

Test it out to make sure it works and then share it with your coworkers, friends, local user group, etc.!

Originally posted on http://miketerrill.net/


IT-DevConnections Session Links

$
0
0

Last month I had the honor of speaking at my first ever IT/Dev Connections in sunny Las Vegas.  I had the pleasure of presenting on Building the Ultimate Operating System Task Sequence with my coworker and good friend Troy Martin.  As promised, we have completed publishing a series of blogs on all the topics in our session.  We managed to pack a bunch into the session and you can find each of the blogs listed below:

Including Pre-Flight Checks in Your Ultimate Task Sequence

ConfigMgr 2012: Always including certain files in your Boot Images

ConfigMgr 2012 OSD: Automatically Open SMSTS log

ConfigMgr 2012 R2 OSD: Create Your Own TS Templates

I am already looking forward to next year.  It was a great conference with lots of familiar faces and reminded me of the early MMS days.

Originally posted on http://miketerrill.net/


Comparing ConfigMgr Date Formats in PowerShell

$
0
0

If you have worked with ConfigMgr much, you know that uses WMI to stores tons of information.  WMI uses the CIM_DATETIME format, which looks like this: yyyymmddHHMMSS.mmmmmmsUUU.  In order to work with this in PowerShell, you need to convert it into something that the Get-Date cmdlet can understand.  Here are two ways that you can accomplish this:

Using the ManagementDateTimeConverter Class:

get-date ([system.management.managementdatetimeconverter]::todatetime('20141004185400.000000+***'))

or by using the ConvertToDateTime() method:

([wmi]"").ConvertToDateTime('20141004185400.000000+***')

And here is an example for a required deployment policy comparing the EnforcementDeadline to the current date:

$EnforcementDate = Get-WmiObject -Namespace "root\ccm\Policy\Machine\RequestedConfig" -Class CCM_ApplicationCIAssignment | Where-Object { (($_.AssignmentName -eq 'My Application_Install') -and ($_.EnforcementDeadline -ne $null))}
$DeadlinePast = $EnforcementDate.ConvertToDateTime($y.EnforcementDeadline) -lt (Get-Date)

Originally posted on http://miketerrill.net/


Using PowerShell to Create a BCD File

$
0
0

Recently, I was curious to see if I could get 1E PXE Everywhere (included with 1E Nomad) to boot a MDT Lite Touch boot image.  Since PXE Everywhere integrates with System Center Configuration Manager, it automatically creates the necessary BCD files based on the ConfigMgr boot images.  So that left me with using the command line utility bcdedit to generate the BCD file that I needed for the MDT Boot Image.  Not that there is anything wrong with bcdedit, it just requires a bit of typing out long commands.  It returns a GUID when the OSLOADER is create that then needs to be used in some of the follow up commands.  This is where I thought it would be nice to have a simple PowerShell cmdlet to do it for me – the only problem is one does not currently exist.  So after a bit of playing around with the syntax, I came up with the following function below.  It still calls bcdedit, but because of the way PowerShell uses certain characters, it is necessary to use various escape techniques.

This is a quick script to get the job done, so there is not any type of error handling or logging.  Also, I follow the PXE Everywhere naming convention of boot.xxxxx.bcd, so feel free to modify the script to your needs or preferences.

#Create-BCD
#Author: Mike Terrill
#Version 1.0

#Disclaimer:
#Your use of these example scripts or cmdlets is at your sole risk. This information is provided “as-is”, without any warranty, whether express or implied, of accuracy,
#completeness, fitness for a particular purpose, title or non-infringement. I shall not be liable for any damages you may sustain by using these examples, whether direct,
#indirect, special, incidental or consequential.

#Usages:
#Create-BCD Name Platform TFTPBlockSize
#Example:
#Create-BCD LiteTouchPE x64 8192
#Will create a BCD file called boot.LiteTouchPE_x64.bcd with a TFTPBlockSize of 8192

function Create-BCD {
    [CmdletBinding()]
    param (
    [Parameter(Mandatory=$true,ValueFromPipeline=$true)][string]$Name,
    [Parameter(Mandatory=$true,ValueFromPipeline=$true)][string]$Platform,
    [Parameter(Mandatory=$true,ValueFromPipeline=$true)][int]$TFTPBlockSize
    )

    $ImageName = $Name + "_" + $Platform
    $BCDFileName = "boot.$ImageName.bcd"
    bcdedit /createstore $BCDFileName
    bcdedit /store $BCDFileName /create "{bootmgr}"
    bcdedit /store $BCDFileName /set --%{bootmgr} description "Boot Manager"
    bcdedit /store $BCDFileName /set --%{bootmgr} fontpath \Boot\Fonts
    bcdedit /store $BCDFileName /create --%{ramdiskoptions} /d "Windows PE"
    bcdedit /store $BCDFileName /set --%{ramdiskoptions} ramdisksdidevice boot
    bcdedit /store $BCDFileName /set --%{ramdiskoptions} ramdisksdipath \boot.sdi
    #Grab the output that contains the GUID
    $x = bcdedit /store $BCDFileName /create /d "$ImageName" /application OSLOADER
    $GUID = $x|%{$_.split(' ')[2]}
    bcdedit /store $BCDFileName /default $GUID
    cmd /c "bcdedit /store $BCDFileName /set {default} device ramdisk=[boot]\Images\$ImageName\boot.$ImageName.wim,{ramdiskoptions}"
    cmd /c "bcdedit /store $BCDFileName /set {default} osdevice ramdisk=[boot]\Images\$ImageName\boot.$ImageName.wim,{ramdiskoptions}"
    bcdedit /store $BCDFileName /set --%{default} systemroot \WINDOWS
    bcdedit /store $BCDFileName /set --%{default} winpe Yes
    bcdedit /store $BCDFileName /set --%{default} detecthal Yes
    cmd /c "bcdedit /store $BCDFileName /set {ramdiskoptions} ramdisktftpblocksize $TFTPBlockSize"
    }

Using the example inputs will generate the following output (bcdedit /store boot.LiteTouchPE_x64.bcd /enum all):

Windows Boot Manager
--------------------
identifier              {bootmgr}
description             Boot Manager
fontpath                \Boot\Fonts
default                 {default}

Windows Boot Loader
-------------------
identifier              {default}
device                  ramdisk=[boot]\Images\LiteTouchPE_x64\boot.LiteTouchPE_x64.wim,{ramdiskoptions}
description             LiteTouchPE_x64
osdevice                ramdisk=[boot]\Images\LiteTouchPE_x64\boot.LiteTouchPE_x64.wim,{ramdiskoptions}
systemroot              \WINDOWS
detecthal               Yes
winpe                   Yes

Setup Ramdisk Options
---------------------
identifier              {ramdiskoptions}
description             Windows PE
ramdisksdidevice        boot
ramdisksdipath          \boot.sdi
ramdisktftpblocksize    8192

And if you were wondering if I got 1E PXE Everywhere to boot a MDT LiteTouch boot image – the answer is absolutely!

Originally posted on http://miketerrill.net/


My Sessions at the Midwest Management Summit

$
0
0

MMS180x150

I am really honored to have been a speaker at the first ever Midwest Management Summit (aka the new MMS), that took place November 10th – 12th in Minnesota.  This event was the who’s who of systems management and did not disappoint.  There were over 100 sessions delivered in three days by 50+ experts (which included 32 Microsoft MVPs).  This is one conference and training event that you will not want to miss next year.

I also got the opportunity to present again with my co-worker and good friend Troy Martin.  Troy and I presented the following two sessions:

Hacking the Task Sequence

We will go behind the scenes of the CM OSD Task Sequence engine to look at all of the Task Sequence variables.  Mike and Troy will show you:

  • Tips and tricks on how to pause, interact and resume a Task Sequence when developing your own custom steps.
  • How to overcome certain limitations like read only variables.
  • How to tweak your Boot Images so that they always contain the tools and utilities that are needed for ultimate success.
  • How the task sequence works “under the hood” and some cool tips for manipulating it.

MMS – Hacking the Task Sequence.pptx

PXE Booting in the Real World

This session will focus on how PXE works and what it takes to get it working in the real world using System Center 2012 R2 Configuration Manager.  In addition to the native PXE boot capabilities in CM, this session will also cover the benefits and capabilities of PXE Everywhere from 1E.

Having difficulty performing zero touch because of 3rd party disk encryption?  Come learn the possibilities that open up when using PXE in your environment. Learn about PXE and what it takes to get up and running.

MMS – PXE Booting in the Real World.pptx

I also got to present for the first time with my co-worker Shawn Cardamon.  For those of you that have not met him, he is full of energy and constantly cracking jokes.  It was a fun presentation and we announced our upcoming 1E Solution Accelerator called 1E Enforcement that we will be releasing for free in the near future.

Advanced Application Management

System Center 2012 Configuration Manager application policies are evaluated prior to content being transferred, so that it can be determined if it the software is actually needed in the first place. Applications make use of the re-evaluation cycle which is enabled by default for all required deployments. This can cause potential issues if a rigid software distribution process is not followed. Come join us in this session as we take a deep look inside Applications and demonstrate some of the pros and cons. Also learn how to do selective Application enforcement and only those Applications that always need to be installed. Learn about Applications and application enforcement.

MMS – Advanced Application Management.pptx

Since 1E was a MMS Platinum Sponsor, we also gave a session on all the cool things that we do at 1E and how we help our customers save money.  For that session, I was joined by Troy, Shawn and also Liam Morrison.

World Class Solutions for Real World Problems

At 1E, our sole mission is to reduce the costs of running IT for our customers and provide avenues to true business value.

Many demands are being placed on IT today to deliver products and services which keep up with the consumerization of IT, provide stronger automation, and at the same time lower overall cost to the business. This session will cover what we see as the true circle of influence systems management has on an organization and how these things may be achieved. For example:

  • Are you currently facing a software audit or need to reduce costs on software licenses?  AppClarity can help by identifying software installation and usage. It can even remove unused installations to prevent further license purchases or audit exposures.
  • Are your users asking about BYOD? Are you constantly providing laptops for contractors and consultants?  With MyWorkNow you can provide a secure virtual corporate Windows desktop at a fraction of the price to any Mac or PC.
  • Are your users looking for an easy way to request and install software?  Has it been challenging to manage and assure the right applications are being installed for your users during an OS deployment? Shopping is the App Store for the Enterprise that puts users and IT in control, each being able to focus on more strategic efforts.
  • Stuck managing a large SCCM infrastructure? Do you have multiple locations to manage with SCCM?  Regardless of size, with Nomad you can eliminate the need for 95%+ of servers from SCCM architectures and still be able to perform all of the functions of SCCM like SWD, OSD and SUM.

Come and learn about 1E’s world class solutions and how they address real world problems.

MMS – World Class Solutions for Real World Problems.pptx

This conference was a great way to end the year and I am already looking forward to the next one!

Originally posted on http://miketerrill.net/


Pre-staging Content during OSD

$
0
0

1E Nomad

In System Center Configuration Manager Operating System Deployment, content can be obtained in one of two ways for network deployments. The first way is to configure the Task Sequence Deployment to “Download all content locally before starting task sequence”. There are a few downsides to this option – it is only available to ConfigMgr clients (sorry, no media or PXE), and second, it downloads ALL packages referenced in the Task Sequence. The second way is to configure the Task Sequence Deployment to “Download content locally when needed by running task sequence”. As the Task Sequence engine gets to a step that has referenced content, it will download the content prior to running the step. This effectively a just in time process. What is missing is the ability to download specific items during the Task Sequence ahead of actually needing them.

Rewind – several years ago (back in the ConfigMgr 2007 days) I was working on an OSD project. While we were brainstorming ideas on what we could do to make the process better and more resilient, I came up with the idea of staging content during a running Task Sequence. The thought was, if we know that we were going to need something (like the WIM, Driver Package, CM Client, etc.), wouldn’t it be good if we could get it before we started the main execution phase of the Task Sequence. Instead of waiting until we were in WinPE (after the disk had already been wiped) and experienced a failure (maybe a network glitch), we could be proactive by staging only the critical content ahead of time. This way, we can get past the point of no return in the Task Sequence, minimize failure and have a useable system with at least the new OS installed. This is when the concept of Pre-staging Content Using Nomad was born.

This feature first appeared in 1E Nomad version 4.1 for ConfigMgr 2007. It has been in every version of Nomad since that time and this functionality extends both ConfigMgr 2007 and ConfigMgr 2012/R2. To make things easy, there is a custom action in the Task Sequence editor called Pre-stage Content Using Nomad. Simply add the step to the Task Sequence and select the Packages that are required during WinPE and OOBE.

01 Pre-stage

The core OSD packages are: WIM, Boot Image, CM Client, USMT, MDT Toolkit, MDT Settings, and Nomad Agent (as well as any additional scripts used in the Task Sequence). Since this is a Task Sequence step that can be configured with Options, Driver Packages can be selectively pre-staged based on the target system. In other words, it is as simple as adding an additional step to pre-stage the correct Driver Package using the same condition that is used later in the Task Sequence to apply the Driver Package. The Pre-stage section of the Task Sequence might look like the following for environments with HP systems:

02 Pre-stage

The Pre-stage step works in WinPE as well as a full OS, so pre-staging can be done under a Baremetal scenario as well as the Refresh scenario (and very soon the Upgrade scenario for Windows 10). The Pre-stage concept is also helpful when needing to perform OSD Refresh over WiFi. Since there is not any WiFi support in the current version of WinPE, simply pre-stage the necessary content before rebooting into WinPE.

If you have used this feature and like it or have other suggests, let me know!

Originally posted on http://miketerrill.net/


Testing Required PXE Booting without the OS Deployment

$
0
0

Network-Windows-Client-icon

If you have ever had the need to test the PXE booting capabilities using System Center 2012 Configuration Manager using a Required Deployment, but did not want the OS Deployment part, then this blog is for you.  With Available Deployments, the user has to press an additional key to get the system to PXE boot.  Once the system boots into WinPE, the wizard is displayed with the list of available Task Sequences.  This makes it nice and easy to test PXE booting functionality and network connectivity of your boot image without starting an actual Task Sequence.  However, with a Required Deployment, no additional key press is required and when you are in WinPE, it is off to the races.  Not a big deal if you are testing on virtual machines, but what if you want to test on a new physical device that you need to roll out and you do not want to go through the whole OSD process?

You could simply put a pause in the beginning of a full Task Sequence, but why bother since there is likely more policies that need to be download.  Also, why take the risk?  Here is a simple three step Task Sequence that you can use to do all of the Required (and Available) PXE boot testing without the OS Deployment.

Start by creating a new custom task sequence and add the boot image you want to test with under the Advanced tab of the Task Sequence Properties:

01 Required PXE

Next, edit the Task Sequence and add a Apply Operating System Image step, selecting an existing image package.  This step is required to make CM think that it is an OSD Task Sequence.

02 Required PXE

Click on the Options tab in order to create a condition so that the step will always evaluate to false.  This can be done by testing for a Task Sequence variable name NEVERTRUE equals TRUE (or if you want to mess with your coworker you can use their NAME equals AWESOME – but just in case they really are awesome you might not want to do this Smile):

03 Required PXE

Create a second step using the Run Command Line step so the TS will pause.  Having this pause is useful when multi-tasking and you look away and miss it.  It also gives you the option to do other cool stuff like dump the Task Sequence variables.  Enter the following for the command line: cmd.exe /c “start /wait cmd.exe”
(Be careful of “smart” quotes if copy and pasting.)

04 Required PXE

Set continue on error on the Options tab.

05 Required PXE

Create a third step using the Run Command Line step so the TS will reboot WinPE.  Enter the following for the command line: wpeutil reboot
Set continue on error on the Options tab on this step as well.

06 Required PXE

Save your changes and then then test it by creating a Required Deployment to a test collection to enjoy non destructive Required PXE Booting!

Originally posted on http://miketerrill.net/


How to create a Dell Command-Configure Package in ConfigMgr

$
0
0

000 Logo

Dell recently released the Dell Command | Configure utility (previously known as the Dell Client Configuration Toolkit – CCTK) that allows IT Pros to configure and manage Dell Enterprise client systems.  The latest release (version 3.1 at the time of this blog) includes support for Windows 10 and WinPE 10.  The Command | Configure utility can be used to enable and standardize BIOS settings automatically across the enterprise, yielding a consistent, standard environment.  Now that Windows 10 is here, organizations are going to want to configure UEFI as the default so that they can leverage features like Secure Boot and Device Guard.

Like the CCTK, there is a GUI component and a command line component that can be installed.  For this post, I am going to show you how to create a basic Package that can be used as part of an OSD Task Sequence under WinPE.

The first thing you need to do is download from here (or search on Dell Command Configure) and install it on a Dell system that is already running Windows 7/8/8.1/10.

Next create a directory on your ConfigMgr Package repository share where you store the source files for your ConfigMgr Packages (for example \\ContentSource\Packages\Dell\Command-Configure-WinPE\3.1.0.250).

Locate the install directory and copy the X86 and X86_64 sub folders to the Package share.  On an x64 system, the default location is C:\Program Files (x86)\Dell\Command Configure.

001 Install Directory

Create a file in the root of the Package directory called cctk.cmd.  Use the following for the contents of the file:


@ECHO OFF

set cmdline=%*

ECHO == Seting BIOS Settings ==

REM Determine Arch
IF "%PROCESSOR_ARCHITECTURE%" == "AMD64" GOTO :X64
GOTO X86

:X64
SET CCTKPath="x86_64"
GOTO RunCCTK

:X86
SET CCTKPath="x86"
GOTO RunCCTK

:RunCCTK
ECHO --Running command %CCTKPath%\cctk.exe %CMDLINE%
%CCTKPath%\cctk.exe %CMDLINE%

EXIT /B %errorlevel%

Next, create another file in the root of the Package directory called HAPIInstall.cmd.  Use the following for the contents of the file:


@echo off
REM Determine Arch
IF "%PROCESSOR_ARCHITECTURE%" == "AMD64" GOTO :X64
GOTO X86

:X64
x86_64\hapi\hapint.exe -i -k C-C-T-K -p "hapint.exe"
GOTO END

:X86
x86\hapi\hapint.exe -i -k C-C-T-K -p "hapint.exe"
GOTO END

:END

Both of these files handle the logic to install either x86 or x64 based on the currently detected platform.  The final Package source directory should look like the following:

002 Package Source Directory

Create a Package in ConfigMgr like you normally would and distribute to the Distribution Points.  A Program is not required, so that can be skipped.

In an upcoming post, I will show how this can be used in an OSD Task Sequence.

Originally posted on http://miketerrill.net


Automating Dell BIOS-UEFI Standards for Windows 10

$
0
0

Uefi_logo

If you are starting to deploy Windows 10 (or are currently deploying Windows 8/8.1), then now is the time to make the switch to UEFI.  A system needs to be configured for UEFI (without Compatibility Support Module being enabled) in order to take advantage of Secure Boot (and other Windows 10 security features like Device Guard).  Secure Boot prevents loading of drivers and OS loaders that are not signed with a certified digital signature, thus preventing malware and root kits that alter the boot process.

The first version of Windows that support Secure Boot was Windows 8 and Windows Server 2012.  If you were one of the many companies that either skipped Windows 8/8.1 or only deployed it in limited quantities, then chances are you deployed your systems for legacy BIOS mode.  This means that your Windows 7 systems have MBR partitioned disks and in order to make the switch to UEFI, these systems need to be re-partitioned.  This is one of the limitations of using the Windows 10 In-place upgrade method, as it does not support changing the disk partitioning structure.  The quickest approach to getting to Windows 10 is the In-place upgrade path and it might make sense to do this on the systems that qualify.  For the ones that don’t (including brand new systems), then you definitely want to start configuring them for UEFI and Secure Boot now!

In my previous post, How to create a Dell Command-Configure Package in ConfigMgr, I showed how you could set up the Dell Command-Configure Package in order to use it in OSD Task Sequences.  Now, I am going to show you an example on how it can be used in WinPE via PXE boot (of course, I use 1E PXE Everywhere 3.0 which is part of Nomad 6.0) to enforce these standards.  This will not only increase standardization in your environment, but also prevent costly mistakes made by manual processes.

The first thing we need to do is create a custom Task Sequence.  For this example, I am going to give it the name of BIOS-UEFI Configuration for Windows 10.

001 Create TS

NOTE: This Task Sequence example will only work on systems that already have a formatted disk.  We will cover handling bare disks at another time.

Once created, edit the Task Sequence.  For those of you using Nomad, create the Set Nomad as Download Program (new in Nomad 6.0) and Install and Configure Nomad in Windows PE as the first two steps.  Otherwise, add an Apply Operating System Image step called Dummy Step to trick CM and put a Task Sequence variable condition on the step so that the TS variable NEVERTRUE equals TRUE.

002 NeverTrue equals True

This is very important for two reasons – 1. it will make CM set this as an OSD TS so that we can boot into WinPE and run it, 2. the condition will always evaluate to false and allow the step to be skipped (cause we really do not want to apply an OS image yet).

Next, add a Group called Dell BIOS-UEFI Configuration and put a WMI condition on the group with the following query:


Select * From Win32_ComputerSystem WHERE Manufacturer LIKE "%DELL%"

003 Dell Group conditions

This way it will only apply to Dell systems if you use other OEMs in your environment and it will make it easier to copy and paste into other Task Sequences.

Each of the following steps in this group will be Run Command Line steps that reference the Package Dell Command-Configure-WinPE 3.1.0.250.  I have split out each of the steps in order to make the solution modular.  In other words, not all settings may apply to all Dell models and conditions can be set on the individual steps accordingly.  So, be sure to test against all models that you support.  Another reason for splitting out the steps is that you will get output from each of the commands.  I have included steps that will attempt to get the current setting prior to the step that actually sets the value.  Some of the output can be read from the status messages that are sent back to ConfigMgr, while others will only be reflected in the smsts.log.  For the steps that get the current values, I have made those ‘continue on error’ in order to prevent the Task Sequence from failing from non-zero return values.  Getting the Secure Boot value is one that returns a non-zero exit code (along with the text “The option ‘secureboot’ is not enabled”, if it is not enabled) and will cause the Task Sequence to fail at that point.  In other words, we do not care if it fails reading a value, but we do care if it fails setting a value.

Also, these settings are ones that I would set, so please research each one using the Dell Command-Configure documentation and set the values that work for your environment.

Here is a list of the settings:
NOTE: each of the commands use a double dash, which is hard to see from the screen shots.


Name: Install Dell HAPI Drivers
Command line: HAPIInstall.cmd

Name: Current Active Boot List
Command line: cctk.cmd bootorder --activebootlist

Name: Enable UEFI
Command line: cctk.cmd bootorder --activebootlist=uefi

Name: Current Legacy ROM Setting
Command line: cctk.cmd --legacyorom

Name: Disable Legacy ROMs
Command line: cctk.cmd --legacyorom=disable

Name: Current Secure Boot Setting
Command line: cctk.cmd --secureboot

Name: Enable Secure Boot
Command line: cctk.cmd --secureboot=enable

Name: Current Wake On Lan Setting
Command line: cctk.cmd --wakeonlan

Name: Enable Wake On Lan
Command line: cctk.cmd --wakeonlan=enable

Name: Current UEFI PXE Setting
Command line: cctk.cmd --uefinwstack

Name: Enable UEFI Network Stack
Command line: cctk.cmd --uefinwstack=enable

Name: Current SATA-RAID Setting
Command line: cctk.cmd --embsataraid

Name: Set SATA Operation - AHCI
Command line: cctk.cmd --embsataraid=ahci

Name: Set PXE Boot on next boot
Command line: cctk.cmd --forcepxeonnextboot=enable

004 Enable UEFI

Outside of the Dell BIOS-UEFI Configuration Group, I put a Run Command Line step called Pause with the condition that the Task Sequence variable PAUSE equals TRUE.  This is useful for testing and/or troubleshooting as it will launch a command line and prevent the Task Sequence from finishing.  Simply put the PAUSE variable on either the collection targeted or a device that is being tested.

The last step is a Set Task Sequence Variable step called Restart WinPE.  This sets the Task Sequence variable SMSTSPostAction to the value wpeutil reboot.  This allows the Task Sequence to finish cleanly.

Hopefully you have found this information useful and it gets you well on your way for standardizing your environment’s BIOS-UEFI settings. By making the change to UEFI, it will allow you to take full advantage of the security features in Windows 10.  Now when you boot into WinPE and run the OSD Task Sequence wizard, it will detect that the system is running UEFI (_SMSTSBootUEFI = TRUE) and the disk will be partitioned and formatted accordingly.

You can also download an export of the Task Sequence here: BIOS-UEFI Configuration for Windows 10.zip

Originally posted on http://miketerrill.net/


Deploying Office 365 with System Center 2012/R2 Configuration Manager and 1E Nomad

$
0
0

BrandLogoOffice365

1 Overview

Microsoft Office 365 introduces a new way to deploy and update Office 365 using Click-to-Run technology. Office 365 is typically installed using the Office 365 portal. However, this presents several challenges in a managed environment. The first challenge is that users must be local administrators on their computers in order to install Office from the Office 365 portal. Hopefully in a well-managed environment, end users do not have local administrator rights, but that is a topic for another time. The second challenge is that the install binaries come from the Office Content Distribution Network (CDN). In other words, the necessary files are streamed down from the Internet to the user’s computer. This also presents a challenge in corporate environments where Internet network connections and Wide Area Network links are already bandwidth constrained. Lastly, Office 365 does not integrate with System Center 2012/R2 Configuration Manager Software Updates (or Windows Update), and instead use the Office CDN for updating and patching Office 365 installations.

Fortunately the Office 365 Team has released the Office Deployment Tool which aides in deploying and updating Office 365 installations from on-premises locations. This document will outline one method on how the Office Deployment Tool can be used to deploy Office 365 with System Center 2012/R2 Configuration and 1E Nomad and leverage the bandwidth efficiencies and peer to peer capabilities from 1E Nomad.

Disclaimer:

Your use of these example scripts is at your sole risk. This information is provided “as-is”, without any warranty, whether express or implied, of accuracy, completeness, fitness for a particular purpose, title or non-infringement. I shall not be liable for any damages you may sustain by using these examples, whether direct, indirect, special, incidental or consequential.

2 Getting Started

The first thing that is required is the Office Deployment Tool. This is available here on the Microsoft Download Center or simply search for “Office Deployment Tool Download” using your favorite search engine (Note: there is a new version of the tool for the Office 2016 release). After downloading the exe, run it, accept the license agreement and click continue.

001 O365

Create a folder called Office 365 in a preferred location, for this example we will use \Downloads\Office 365.

002 O365

After running, it should display a “Files extracted successfully.” message. If not, make sure you have proper access to the target directory.

003 O365

The target directory should contain two files – a sample configuration.xml and setup.exe.

004 O365

Make a copy of the configuration.xml file and call it download.xml. Edit the file so that it contains the following contents (be careful of word wrap):


<Configuration>
<Add SourcePath="\\CM12PS1.contoso.com\ContentSource\Packages\Microsoft\Office 365 x86" OfficeClientEdition="32" >
<Product ID="O365ProPlusRetail">
<Language ID="en-us" />
</Product>
<Product ID="VisioProRetail">
<Language ID="en-us" />
</Product>
</Add>
</Configuration>

This will download the source files for the 32-bit version of Office Professional Plus and also the 32-bit version of Visio Professional. Adjust the products accordingly, downloading all of the Office Products that are used in your environment. If there are users that do not use some products (like Visio Professional), then multiple deployment configuration files can be created. For more information on the various options, please refer to the Reference for Click-to-Run configuration.xml file.

For the SourcePath, enter the location of your Configuration Manager package repository.

3 Setup the Office 365 Source Files

Open a command prompt and navigate to the directory containing the Office Deployment Tool (for my example this is C:\Users\Administrator.CONTOSO\Downloads\Office 365). Run setup.exe using the following command line:

Setup.exe /download download.xml

005 O365

This could take a few minutes depending on the speed of your Internet connection. The above configuration downloads about 1.08 GB of source files. The following directory structure will look like the following (the screen shot is from the April 2015 release and the version changes monthly):

006 O365

Copy setup.exe (from the Downloads\Office 365 directory) to the Office 365 x86 folder.

Create a file called Install.xml in the Office 365 x86 folder with the following contents (be careful of word wrap):


<Configuration>
<Add SourcePath="C:\Preload\Office365" OfficeClientEdition="32" >
<Product ID="O365ProPlusRetail">
<Language ID="en-us" />
</Product>
<Product ID="VisioProRetail">
<Language ID="en-us" />
</Product>
</Add>
<Updates Enabled="TRUE" UpdatePath="C:\Preload\Office365" />
<Display Level="None" AcceptEULA="TRUE" />
<Logging Level="Standard" Path="%temp%" />
<Property Name="AUTOACTIVATE" Value="1" />
</Configuration>

This will point both the SourePath and the UpdatePath to a local path called C:\Preload\Office365 on the user’s computer. It will install Office 365 from this location and it will also update from this location. The UpdatePath could be defined as an internal share, however, you would lose the intelligent bandwidth and peer to peer capabilities that Nomad provides when deploying updates.

The above configuration file will install the following components:
Access 2013
Excel 2013
InfoPath Designer 2013
InfoPath Filler 2013
OneDrive for Business 2013
OneNote2013
Outlook 2013
PowerPoint 2013
Publisher 2013
Send to OneNote 2013
Skype for Business 2015
Visio 2013
Word 2013
Office 2013 Tools

Chances are not all components will be installed in your environment, so for more information on the various options, please refer to the Reference for Click-to-Run configuration.xml file. You can even create multiple configuration files (and corresponding CM Programs as seen below) all within the same package.

Next, create a file called Install.bat (yes I know – a bat file, right?  But you would be surprised how many companies have not switched to PowerShell yet) in the Office 365 x86 folder with the following contents (be careful of word wrap):


@ECHO OFF
REM Install.bat
REM Version 1
REM 4/25/2015

IF EXIST C:\Preload GOTO MDO365

MD C:\Preload

:MDO365

IF EXIST C:\Preload\Office365 GOTO CLEANUP

MD C:\Preload\Office365

:CLEANUP

IF EXIST C:\Preload\Office365\Office (

RD /S /Q C:\Preload\Office365\Office

)

DEL /F /Q C:\Preload\Office365\*.*

SET SOURCEDIR=%~dp0

SET O365CACHE=C:\Preload\Office365\

XCOPY *. %O365CACHE% /T /E

SETLOCAL ENABLEDELAYEDEXPANSION

for /R %~dp0 %%G IN (*.*) do (

SET SOURCE=%%G

SET DEST=!SOURCE:%SOURCEDIR%=%O365CACHE%!

fsutil hardlink create !DEST! !SOURCE!

)

ENDLOCAL

REM Delete Install.bat from the Preload\Office365 directory

DEL /F /Q C:\Preload\Office365\Install.bat

IF "%1"=="/pre-cache" GOTO END

%O365CACHE%Setup.exe /configure %O365CACHE%install.xml

:END

Since we are installing and upgrading Office 365 from the local disk, we create a set directory that will be used throughout the process. This is done because the directory in the CCM Cache will be a random character and the configuration file needs a set path. The contents will be hard linked from the CCM Cache to the C:\Preload\Office365 directory in order to minimize required disk space (it is already hard linked from the Nomad cache in to the CCM Cache). Effectively, the contents are only on the disk once with three pointers.

Since the files change between updates, the Office 365 cache location is cleared of any previous files and then new hard links are created with the new files. This keeps the Office 365 cache from growing and taking up unnecessary disk space. Since the script is creating hard links, the process takes a split second.

The contents of the Office 365 x86 directory should now look like the following:

007 O365

4 Create the Office 365 Package in CM

In the Configuration Manager Console, create a new Package in the Software Library.

008 O365

Populate the following package information using the same source folder as above:

009 O365

Choose Standard program as the program type:

010 O365

Populated the following information about the standard program:

011 O365

Enter the corresponding requirements:

012 O365

On the Nomad Settings page, enable Nomad and set the desired Cache Priority:

013 O365

Confirm the information on the summary screen:

014 O365

Confirm the successful creation and click Close:

015 O365

Back in the console under Packages, right-click on the Office 365 package and select Create Program:

016 O365

Select Standard program:

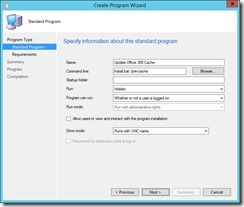
017 O365

For the program name use Update Office 365 Cache with the command line: Install.bat /pre-cache:

018 O365

Use 1 GB for the estimated disk space and the same platform requirements as before:

019 O365

Confirm the information on the summary screen:

020 O365

Confirm the successful creation and click Close:

021 O365

5 Distribute the Package to the DP(s)

Back in the console under Packages, right-click on the Office 365 package, select Distribute Content:

022 O365

Review the selected content and click Next:

023 O365

Select the correct Distribution Points or Distribution Point Group:

024 O365

On the summary page confirm the settings and click Next:

025 O365

On the completion page, confirm success and click Close:

026 O365

6 Create the Office 365 Collection

Create the collection that will be used to deploy Office 365 and also update the local Office 365 cache. Depending on your preference and deployment strategy, two collections can be created instead of one. One can be for the initial deployment and the other can be for updating the Office 365 cache on a monthly, quarterly or as needed basis. For this purposes of this document, we will keep it simple and only create one collection.

In the CM console under Device Collections, right-click and select Create Device Collection:

027 O365

Give the collection the name Office 365 and select a corresponding limiting collection:

028 O365

Add a couple of test systems to the Office 365 collection that is being created:

029 O365

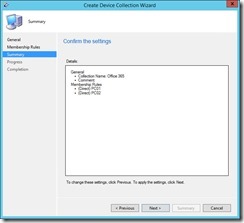
Confirm the settings on the summary page:

030 O365

On the completion page, confirm the successful completion and click Close:

031 O365

7 Create the Office 365 Installation Deployment

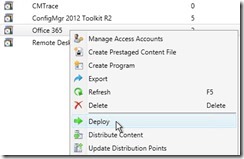
Now create the Deployment that will install Office 365 on systems that are in the collection that was just created in the previous step. In the console under Packages, right-click and select Deploy.

032 O365

Select Install Office 365 for the software and Office 365 for the collection:

033 O365

Verify that the content is on the required Distribution Points/Groups:

034 O365

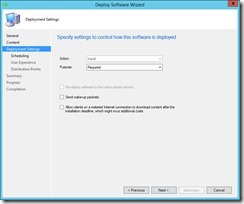
On the Deployment Settings page, leave the Purpose set to Required for an unattended installation:

035 O365

Set the schedule and rerun behavior:

036 O365

Click Next on the User Experience:

037 O365

On the Distribution Points page, since we are using Nomad we can safely select Download content from distribution point and run locally for slow and unreliable network boundaries (which also includes undefined network boundaries). That is another benefit of Nomad is the fact that you do not need to ever worry about managing boundaries in order for it to work (unlike other solutions). In addition, enabled Allow clients to use a fallback source location for content (since with Nomad, you probably only have a couple of Distribution Points in the datacenter).

038 O365

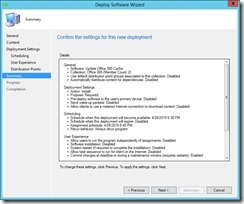
On the Summary page, verify the settings and click Next:

039 O365

Verify that the Deploy Software Wizard completed successfully:

040 O365

8 Verify Installation

Logging onto PC01, we see using the Nomad Branch GUI that it is the master and is downloading the package from the CM Distribution Point:

041 O365

Whereas on PC02, it is pulling the Office 365 package from PC01 (notice the mode – SMB from Peer):

042 O365

Back in the CM console, we see that both installed successfully:

043 O365

Using fsutil, you can see that the files are only on the disk once and have multiple pointers (i.e. hard links). One points to the Nomad cache, one to the CM Cache and the last one to the Preload\Office365 directory:

044 O365

9 Create the Update Office 365 Cache Deployment

Now it is time to create the Update Office 365 Cache Deployment. Office 365 is updated on the second Tuesday of the month with updates and/or security patches. The process is combined, so there is currently no way to split out just the security updates. The version is displayed on the Account page of anyone of the Office applications. This is from the April 2015 release (version 15.0.4711.1002, which is the same as a subdirectory in our Office 365 package as seen above):

045 O365

The following knowledge base article lists all of the Office 365 updates: https://support.microsoft.com/en-us/gp/office-2013-365-update

The Office 365 package can be updated monthly, every other month, or quarterly depending on your company’s patching frequency. Keep in mind that each of the files change in the monthly download, so the majority of the files will need to be cached. Also, it is probably best to test them out on a pilot group prior to releasing them to the entire enterprise. This discussion goes beyond the subject of this article, but there is a version property that can be used in the configuration file.

In the CM Console under Packages, right-click on the Office 365 package and select Deploy:

032 O365

Select Update Office 365 Cache for the software and Office 365 for the collection:

047 O365

Verify that the content is on the required Distribution Points/Groups:

034 O365

On the Deployment Settings page, leave the Purpose set to Required for an unattended installation:

035 O365

Set the schedule and rerun behavior. Since this is just updating the Office 365 Cache, this example configures it to run on the third Tuesday of every month and the rerun behavior is set to Always rerun program:

050 O365

Click Next on the User Experience:

037 O365

Just like the Install Office 365 Deployment, on the Distribution Points page, since we are using Nomad we can safely select Download content from distribution point and run locally for slow and unreliable network boundaries (which also includes undefined network boundaries). That is another benefit of Nomad is the fact that you do not need to ever worry about managing boundaries in order for it to work (unlike other solutions). In addition, enabled Allow clients to use a fallback source location for content (since with Nomad, you probably only have a couple of Distribution Points in the datacenter).

038 O365

On the Summary page, verify the settings and click Next:

053 O365

Verify that the Deploy Software Wizard completed successfully:

054 O365

Now on the third Tuesday of every month, the clients will update their Office 365 cache with the latest binaries. Office 365 updates are done from a scheduled task on the local system and will be updated accordingly after the next cycle.

10 Summary

The above process outlines one method for deploying and updating Office 365 in a managed environment by leveraging the current investment in System Center 2012/R2 Configuration Manager and 1E Nomad. This process will overcome the challenges that were mentioned in the beginning of this article. It will allow companies to deploy and update Office 365 without causing negative impact to the corporate WAN links and Internet connections.  It can be used without Nomad, but then you lose the P2P functionality and intelligent bandwidth management when downloading from a DP.  So a word to the wise if you don’t use Nomad – be careful!!!!  Or better yet – head over to www.1e.com!

11 Reference Links

Office Deployment Tool for Click-to-Run

Deploy Click-to-Run for Office 365 products by using the Office Deployment Tool

Overview of the update process for Office 365 ProPlus

Managing Updates for Office 365 ProPlus – Part 1

Managing Updates for Office 365 ProPlus – Part 2

System Center 2012 R2 Configuration Manager

1E Nomad

Originally posted on http://miketerrill.net/


Inventory Secure Boot State and UEFI with ConfigMgr

$
0
0

img-secureNow that Windows 10 has been released, you are probably starting to take a closer look at the new OS and the related security benefits that it has to offer.  Secure Boot is a supported security feature in Windows 10 that secures the boot process by only allowing the loading of drivers and boot loaders that are signed with a trusted signature.  The first versions of Windows to support Secure Boot were Windows 8 and Windows Server 2012.  Secure Boot requires computer systems to be running UEFI 2.3.1 (or later).  Legacy ROMs or compatibility support modules (CSM) must be disabled in order to enable Secure Boot.

In this blog, I will show you how to extend the Configuration Manager hardware inventory so that you can report on the state of Secure Boot in your environment.  This will not only tell you which systems have Secure Boot enabled or disabled, but it will also help you detect systems that are not currently running UEFI (the ones running in BIOS mode).  Identifying these systems will be helpful when determining the deployment method that you will select when moving to Windows 10.  If it is a requirement of your security team that all systems running Windows 10 must also be running Secure Boot, it will give you an idea on how much effort will be involved during the deployment process.

Now, for the systems that are running in BIOS mode, it will not show which ones are UEFI capable.  However, most enterprise class systems purchased in the last three years are UEFI capable.  In a later post, I will show how you can use OEM specific tools that will help you determine which systems are UEFI capable.  If the desire is to ‘take the hit’ and change all of the BIOS systems to UEFI as part of the Windows 10 deployment, then this will require the disks to be completely re-partitioned so that it can boot UEFI.  This is a destructive process, meaning that anything on the disk will be lost and any data that needs to be retained needs to be backed up to another location (like a network share, State Migration Point, external storage, or even a peer system – like Nomad Peer Backup Assistance).  Note that it is not necessary to convert to UEFI in order to upgrade to Windows 10.  Windows 10 supports systems that are currently running in BIOS mode, but you cannot take advantage of the security features in Windows 10 – like Secure Boot, Device Guard and Credential Guard.

The inventory extension is actually pretty simple and it will not add that much additional data to the hardware inventory scan.  Since I am keying off of a registry key, this extension uses the registry property provider and requires an addition to the configuration.mof file.  This file can be found in the .\inboxes\clifiles.src\hinv directory where Configuration Manager is installed on the Primary Site Server.  Add in the following section (also provided below in a file called UEFI_SECUREBOOT_CONFIGURATION.mof) at the end of file in between the // Added extensions start and // Added extensions end lines:

// ==================================================================
// START SECTION
// Custom UEFI Secure Boot Settings
// ==================================================================

#pragma namespace ("\\\\.\\root\\cimv2")
#pragma deleteclass("SecureBootState", NOFAIL)
[DYNPROPS]
Class SecureBootState
{
	[key] string KeyName;
	Uint32 UEFISecureBootEnabled;
};

[DYNPROPS]
Instance of SecureBootState
{
	KeyName="Secure Boot Settings";
	[PropertyContext("Local|HKEY_LOCAL_MACHINE\\SYSTEM\\CurrentControlSet\\Control\\SecureBoot\\State|UEFISecureBootEnabled"),Dynamic,Provider("RegPropProv")] UEFISecureBootEnabled;
};

// ==================================================================
// Custom UEFI Secure Boot Settings
// END SECTION
// ==================================================================

Next, save the following text to a file called UEFI_SECUREBOOT_SMS_DEF.mof (or download the file below):


// ==================================================================
// START SECTION
// Custom UEFI Secure Boot Settings
// ==================================================================

#pragma namespace ("\\\\.\\root\\cimv2\\SMS")
#pragma deleteclass("SecureBootState", NOFAIL)
[SMS_Report(TRUE),
SMS_Group_Name("Secure Boot State"),
SMS_Class_ID("UEFI|SecureBootState|1.0")]
Class SecureBootState: SMS_Class_Template
{
[SMS_Report(TRUE),key] string KeyName;
[SMS_Report(TRUE)] Uint32 UEFISecureBootEnabled;
};

// ==================================================================
// Custom UEFI Secure Boot Settings
// END SECTION
// ==================================================================

I typically make a backup of each file on the Primary Site Server in a folder called Custom MOF Extensions so that they can be backed up as part of a DR plan and so other team members know what custom inventory extensions were done.

Following this, navigate to the Default Client Settings in the Configuration Manager Console and select the Hardware Inventory section.  Once open, click on the Set Classes … button:

001 Inventory

On the Hardware Inventory Classes screen, click the Import button and browse to the location where the UEFI_SECUREBOOT_SMS_DEF.mof file was saved earlier and leave the default selected (Import both hardware inventory classes and hardware inventory class settings) when prompted:

002 Inventory

You should now see the new class listed and it will be enabled.  If you would rather inventory this class on a specific collection of systems (like workstations), then un-select it from in the following screen.

003 Inventory

Once systems start processing the new inventory extension, you will see a new Hardware Inventory category in Resource Explorer called Secure Boot State.  If a system is running in UEFI mode, it will have a 1 in the column UEFI Secure Boot enabled for systems that have Secure Boot enabled:

004 Inventory

For systems that do not have Secure Boot enabled but are running in UEFI mode, the value will be 0, and for those systems not running in UEFI (i.e. ones running in BIOS mode), the value will be null.

Files:

UEFI_SECUREBOOT_CONFIGURATION.mof

UEFI_SECUREBOOT_SMS_DEF.mof

Originally posted on http://miketerrill.net


Testing Required PXE Booting without the OS Deployment

$
0
0

Network-Windows-Client-icon

If you have ever had the need to test the PXE booting capabilities using System Center 2012 Configuration Manager using a Required Deployment, but did not want the OS Deployment part, then this blog is for you.  With Available Deployments, the user has to press an additional key to get the system to PXE boot.  Once the system boots into WinPE, the wizard is displayed with the list of available Task Sequences.  This makes it nice and easy to test PXE booting functionality and network connectivity of your boot image without starting an actual Task Sequence.  However, with a Required Deployment, no additional key press is required and when you are in WinPE, it is off to the races.  Not a big deal if you are testing on virtual machines, but what if you want to test on a new physical device that you need to roll out and you do not want to go through the whole OSD process?

You could simply put a pause in the beginning of a full Task Sequence, but why bother since there is likely more policies that need to be download.  Also, why take the risk?  Here is a simple three step Task Sequence that you can use to do all of the Required (and Available) PXE boot testing without the OS Deployment.

Start by creating a new custom task sequence and add the boot image you want to test with under the Advanced tab of the Task Sequence Properties:

01 Required PXE

Next, edit the Task Sequence and add a Apply Operating System Image step, selecting an existing image package.  This step is required to make CM think that it is an OSD Task Sequence.

02 Required PXE

Click on the Options tab in order to create a condition so that the step will always evaluate to false.  This can be done by testing for a Task Sequence variable name NEVERTRUE equals TRUE (or if you want to mess with your coworker you can use their NAME equals AWESOME – but just in case they really are awesome you might not want to do this Smile):

03 Required PXE

Create a second step using the Run Command Line step so the TS will pause.  Having this pause is useful when multi-tasking and you look away and miss it.  It also gives you the option to do other cool stuff like dump the Task Sequence variables.  Enter the following for the command line: cmd.exe /c “start /wait cmd.exe”
(Be careful of “smart” quotes if copy and pasting.)

04 Required PXE

Set continue on error on the Options tab.

05 Required PXE

Create a third step using the Run Command Line step so the TS will reboot WinPE.  Enter the following for the command line: wpeutil reboot
Set continue on error on the Options tab on this step as well.

06 Required PXE

Save your changes and then then test it by creating a Required Deployment to a test collection to enjoy non destructive Required PXE Booting!

Originally posted on https://miketerrill.net/


How to create a Dell Command-Configure Package in ConfigMgr

$
0
0

000 Logo

Dell recently released the Dell Command | Configure utility (previously known as the Dell Client Configuration Toolkit – CCTK) that allows IT Pros to configure and manage Dell Enterprise client systems.  The latest release (version 3.1 at the time of this blog) includes support for Windows 10 and WinPE 10.  The Command | Configure utility can be used to enable and standardize BIOS settings automatically across the enterprise, yielding a consistent, standard environment.  Now that Windows 10 is here, organizations are going to want to configure UEFI as the default so that they can leverage features like Secure Boot and Device Guard.

Like the CCTK, there is a GUI component and a command line component that can be installed.  For this post, I am going to show you how to create a basic Package that can be used as part of an OSD Task Sequence under WinPE.

The first thing you need to do is download from here (or search on Dell Command Configure) and install it on a Dell system that is already running Windows 7/8/8.1/10.

Next create a directory on your ConfigMgr Package repository share where you store the source files for your ConfigMgr Packages (for example \\ContentSource\Packages\Dell\Command-Configure-WinPE\3.1.0.250).

Locate the install directory and copy the X86 and X86_64 sub folders to the Package share.  On an x64 system, the default location is C:\Program Files (x86)\Dell\Command Configure.

001 Install Directory

Create a file in the root of the Package directory called cctk.cmd.  Use the following for the contents of the file:


@ECHO OFF

set cmdline=%*

ECHO == Seting BIOS Settings ==

REM Determine Arch
IF "%PROCESSOR_ARCHITECTURE%" == "AMD64" GOTO :X64
GOTO X86

:X64
SET CCTKPath="x86_64"
GOTO RunCCTK

:X86
SET CCTKPath="x86"
GOTO RunCCTK

:RunCCTK
ECHO --Running command %CCTKPath%\cctk.exe %CMDLINE%
%CCTKPath%\cctk.exe %CMDLINE%

EXIT /B %errorlevel%

Next, create another file in the root of the Package directory called HAPIInstall.cmd.  Use the following for the contents of the file:


@echo off
REM Determine Arch
IF "%PROCESSOR_ARCHITECTURE%" == "AMD64" GOTO :X64
GOTO X86

:X64
x86_64\hapi\hapint.exe -i -k C-C-T-K -p "hapint.exe"
GOTO END

:X86
x86\hapi\hapint.exe -i -k C-C-T-K -p "hapint.exe"
GOTO END

:END

Both of these files handle the logic to install either x86 or x64 based on the currently detected platform.  The final Package source directory should look like the following:

002 Package Source Directory

Create a Package in ConfigMgr like you normally would and distribute to the Distribution Points.  A Program is not required, so that can be skipped.

In an upcoming post, I will show how this can be used in an OSD Task Sequence.

Originally posted on http://miketerrill.net


Automating Dell BIOS-UEFI Standards for Windows 10

$
0
0

Uefi_logo

If you are starting to deploy Windows 10 (or are currently deploying Windows 8/8.1), then now is the time to make the switch to UEFI.  A system needs to be configured for UEFI (without Compatibility Support Module being enabled) in order to take advantage of Secure Boot (and other Windows 10 security features like Device Guard).  Secure Boot prevents loading of drivers and OS loaders that are not signed with a certified digital signature, thus preventing malware and root kits that alter the boot process.

The first version of Windows that support Secure Boot was Windows 8 and Windows Server 2012.  If you were one of the many companies that either skipped Windows 8/8.1 or only deployed it in limited quantities, then chances are you deployed your systems for legacy BIOS mode.  This means that your Windows 7 systems have MBR partitioned disks and in order to make the switch to UEFI, these systems need to be re-partitioned.  This is one of the limitations of using the Windows 10 In-place upgrade method, as it does not support changing the disk partitioning structure.  The quickest approach to getting to Windows 10 is the In-place upgrade path and it might make sense to do this on the systems that qualify.  For the ones that don’t (including brand new systems), then you definitely want to start configuring them for UEFI and Secure Boot now!

In my previous post, How to create a Dell Command-Configure Package in ConfigMgr, I showed how you could set up the Dell Command-Configure Package in order to use it in OSD Task Sequences.  Now, I am going to show you an example on how it can be used in WinPE via PXE boot (of course, I use 1E PXE Everywhere 3.0 which is part of Nomad 6.0) to enforce these standards.  This will not only increase standardization in your environment, but also prevent costly mistakes made by manual processes.

The first thing we need to do is create a custom Task Sequence.  For this example, I am going to give it the name of BIOS-UEFI Configuration for Windows 10.

001 Create TS

NOTE: This Task Sequence example will only work on systems that already have a formatted disk.  We will cover handling bare disks at another time.

Once created, edit the Task Sequence.  For those of you using Nomad, create the Set Nomad as Download Program (new in Nomad 6.0) and Install and Configure Nomad in Windows PE as the first two steps.  Otherwise, add an Apply Operating System Image step called Dummy Step to trick CM and put a Task Sequence variable condition on the step so that the TS variable NEVERTRUE equals TRUE.

002 NeverTrue equals True

This is very important for two reasons – 1. it will make CM set this as an OSD TS so that we can boot into WinPE and run it, 2. the condition will always evaluate to false and allow the step to be skipped (cause we really do not want to apply an OS image yet).

Next, add a Group called Dell BIOS-UEFI Configuration and put a WMI condition on the group with the following query:


Select * From Win32_ComputerSystem WHERE Manufacturer LIKE "%DELL%"

003 Dell Group conditions

This way it will only apply to Dell systems if you use other OEMs in your environment and it will make it easier to copy and paste into other Task Sequences.

Each of the following steps in this group will be Run Command Line steps that reference the Package Dell Command-Configure-WinPE 3.1.0.250.  I have split out each of the steps in order to make the solution modular.  In other words, not all settings may apply to all Dell models and conditions can be set on the individual steps accordingly.  So, be sure to test against all models that you support.  Another reason for splitting out the steps is that you will get output from each of the commands.  I have included steps that will attempt to get the current setting prior to the step that actually sets the value.  Some of the output can be read from the status messages that are sent back to ConfigMgr, while others will only be reflected in the smsts.log.  For the steps that get the current values, I have made those ‘continue on error’ in order to prevent the Task Sequence from failing from non-zero return values.  Getting the Secure Boot value is one that returns a non-zero exit code (along with the text “The option ‘secureboot’ is not enabled”, if it is not enabled) and will cause the Task Sequence to fail at that point.  In other words, we do not care if it fails reading a value, but we do care if it fails setting a value.

Also, these settings are ones that I would set, so please research each one using the Dell Command-Configure documentation and set the values that work for your environment.

Here is a list of the settings:
NOTE: each of the commands use a double dash, which is hard to see from the screen shots.


Name: Install Dell HAPI Drivers
Command line: HAPIInstall.cmd

Name: Current Active Boot List
Command line: cctk.cmd bootorder --activebootlist

Name: Enable UEFI
Command line: cctk.cmd bootorder --activebootlist=uefi

Name: Current Legacy ROM Setting
Command line: cctk.cmd --legacyorom

Name: Disable Legacy ROMs
Command line: cctk.cmd --legacyorom=disable

Name: Current Secure Boot Setting
Command line: cctk.cmd --secureboot

Name: Enable Secure Boot
Command line: cctk.cmd --secureboot=enable

Name: Current Wake On Lan Setting
Command line: cctk.cmd --wakeonlan

Name: Enable Wake On Lan
Command line: cctk.cmd --wakeonlan=enable

Name: Current UEFI PXE Setting
Command line: cctk.cmd --uefinwstack

Name: Enable UEFI Network Stack
Command line: cctk.cmd --uefinwstack=enable

Name: Current SATA-RAID Setting
Command line: cctk.cmd --embsataraid

Name: Set SATA Operation - AHCI
Command line: cctk.cmd --embsataraid=ahci

Name: Set PXE Boot on next boot
Command line: cctk.cmd --forcepxeonnextboot=enable

004 Enable UEFI

Outside of the Dell BIOS-UEFI Configuration Group, I put a Run Command Line step called Pause with the condition that the Task Sequence variable PAUSE equals TRUE.  This is useful for testing and/or troubleshooting as it will launch a command line and prevent the Task Sequence from finishing.  Simply put the PAUSE variable on either the collection targeted or a device that is being tested.

The last step is a Set Task Sequence Variable step called Restart WinPE.  This sets the Task Sequence variable SMSTSPostAction to the value wpeutil reboot.  This allows the Task Sequence to finish cleanly.

Hopefully you have found this information useful and it gets you well on your way for standardizing your environment’s BIOS-UEFI settings. By making the change to UEFI, it will allow you to take full advantage of the security features in Windows 10.  Now when you boot into WinPE and run the OSD Task Sequence wizard, it will detect that the system is running UEFI (_SMSTSBootUEFI = TRUE) and the disk will be partitioned and formatted accordingly.

You can also download an export of the Task Sequence (updated for CM 1511) here: Dell BIOS-UEFI Configuration for Windows 10 x64.zip

Originally posted on https://miketerrill.net/


Deploying Office 365 with System Center 2012/R2 Configuration Manager and 1E Nomad

$
0
0

BrandLogoOffice365

1 Overview

Microsoft Office 365 introduces a new way to deploy and update Office 365 using Click-to-Run technology. Office 365 is typically installed using the Office 365 portal. However, this presents several challenges in a managed environment. The first challenge is that users must be local administrators on their computers in order to install Office from the Office 365 portal. Hopefully in a well-managed environment, end users do not have local administrator rights, but that is a topic for another time. The second challenge is that the install binaries come from the Office Content Distribution Network (CDN). In other words, the necessary files are streamed down from the Internet to the user’s computer. This also presents a challenge in corporate environments where Internet network connections and Wide Area Network links are already bandwidth constrained. Lastly, Office 365 does not integrate with System Center 2012/R2 Configuration Manager Software Updates (or Windows Update), and instead use the Office CDN for updating and patching Office 365 installations.

Fortunately the Office 365 Team has released the Office Deployment Tool which aides in deploying and updating Office 365 installations from on-premises locations. This document will outline one method on how the Office Deployment Tool can be used to deploy Office 365 with System Center 2012/R2 Configuration and 1E Nomad and leverage the bandwidth efficiencies and peer to peer capabilities from 1E Nomad.

Disclaimer:

Your use of these example scripts is at your sole risk. This information is provided “as-is”, without any warranty, whether express or implied, of accuracy, completeness, fitness for a particular purpose, title or non-infringement. I shall not be liable for any damages you may sustain by using these examples, whether direct, indirect, special, incidental or consequential.

2 Getting Started

The first thing that is required is the Office Deployment Tool. This is available here on the Microsoft Download Center or simply search for “Office Deployment Tool Download” using your favorite search engine (Note: there is a new version of the tool for the Office 2016 release). After downloading the exe, run it, accept the license agreement and click continue.

001 O365

Create a folder called Office 365 in a preferred location, for this example we will use \Downloads\Office 365.

002 O365

After running, it should display a “Files extracted successfully.” message. If not, make sure you have proper access to the target directory.

003 O365

The target directory should contain two files – a sample configuration.xml and setup.exe.

004 O365

Make a copy of the configuration.xml file and call it download.xml. Edit the file so that it contains the following contents (be careful of word wrap):


<Configuration>
<Add SourcePath="\\CM12PS1.contoso.com\ContentSource\Packages\Microsoft\Office 365 x86" OfficeClientEdition="32" >
<Product ID="O365ProPlusRetail">
<Language ID="en-us" />
</Product>
<Product ID="VisioProRetail">
<Language ID="en-us" />
</Product>
</Add>
</Configuration>

This will download the source files for the 32-bit version of Office Professional Plus and also the 32-bit version of Visio Professional. Adjust the products accordingly, downloading all of the Office Products that are used in your environment. If there are users that do not use some products (like Visio Professional), then multiple deployment configuration files can be created. For more information on the various options, please refer to the Reference for Click-to-Run configuration.xml file.

For the SourcePath, enter the location of your Configuration Manager package repository.

3 Setup the Office 365 Source Files

Open a command prompt and navigate to the directory containing the Office Deployment Tool (for my example this is C:\Users\Administrator.CONTOSO\Downloads\Office 365). Run setup.exe using the following command line:

Setup.exe /download download.xml

005 O365

This could take a few minutes depending on the speed of your Internet connection. The above configuration downloads about 1.08 GB of source files. The following directory structure will look like the following (the screen shot is from the April 2015 release and the version changes monthly):

006 O365

Copy setup.exe (from the Downloads\Office 365 directory) to the Office 365 x86 folder.

Create a file called Install.xml in the Office 365 x86 folder with the following contents (be careful of word wrap):


<Configuration>
<Add SourcePath="C:\Preload\Office365" OfficeClientEdition="32" >
<Product ID="O365ProPlusRetail">
<Language ID="en-us" />
</Product>
<Product ID="VisioProRetail">
<Language ID="en-us" />
</Product>
</Add>
<Updates Enabled="TRUE" UpdatePath="C:\Preload\Office365" />
<Display Level="None" AcceptEULA="TRUE" />
<Logging Level="Standard" Path="%temp%" />
<Property Name="AUTOACTIVATE" Value="1" />
</Configuration>

This will point both the SourePath and the UpdatePath to a local path called C:\Preload\Office365 on the user’s computer. It will install Office 365 from this location and it will also update from this location. The UpdatePath could be defined as an internal share, however, you would lose the intelligent bandwidth and peer to peer capabilities that Nomad provides when deploying updates.

The above configuration file will install the following components:
Access 2013
Excel 2013
InfoPath Designer 2013
InfoPath Filler 2013
OneDrive for Business 2013
OneNote2013
Outlook 2013
PowerPoint 2013
Publisher 2013
Send to OneNote 2013
Skype for Business 2015
Visio 2013
Word 2013
Office 2013 Tools

Chances are not all components will be installed in your environment, so for more information on the various options, please refer to the Reference for Click-to-Run configuration.xml file. You can even create multiple configuration files (and corresponding CM Programs as seen below) all within the same package.

Next, create a file called Install.bat (yes I know – a bat file, right?  But you would be surprised how many companies have not switched to PowerShell yet) in the Office 365 x86 folder with the following contents (be careful of word wrap):


@ECHO OFF
REM Install.bat
REM Version 1
REM 4/25/2015

IF EXIST C:\Preload GOTO MDO365

MD C:\Preload

:MDO365

IF EXIST C:\Preload\Office365 GOTO CLEANUP

MD C:\Preload\Office365

:CLEANUP

IF EXIST C:\Preload\Office365\Office (

RD /S /Q C:\Preload\Office365\Office

)

DEL /F /Q C:\Preload\Office365\*.*

SET SOURCEDIR=%~dp0

SET O365CACHE=C:\Preload\Office365\

XCOPY *. %O365CACHE% /T /E

SETLOCAL ENABLEDELAYEDEXPANSION

for /R %~dp0 %%G IN (*.*) do (

SET SOURCE=%%G

SET DEST=!SOURCE:%SOURCEDIR%=%O365CACHE%!

fsutil hardlink create !DEST! !SOURCE!

)

ENDLOCAL

REM Delete Install.bat from the Preload\Office365 directory

DEL /F /Q C:\Preload\Office365\Install.bat

IF "%1"=="/pre-cache" GOTO END

%O365CACHE%Setup.exe /configure %O365CACHE%install.xml

:END

Since we are installing and upgrading Office 365 from the local disk, we create a set directory that will be used throughout the process. This is done because the directory in the CCM Cache will be a random character and the configuration file needs a set path. The contents will be hard linked from the CCM Cache to the C:\Preload\Office365 directory in order to minimize required disk space (it is already hard linked from the Nomad cache in to the CCM Cache). Effectively, the contents are only on the disk once with three pointers.

Since the files change between updates, the Office 365 cache location is cleared of any previous files and then new hard links are created with the new files. This keeps the Office 365 cache from growing and taking up unnecessary disk space. Since the script is creating hard links, the process takes a split second.

The contents of the Office 365 x86 directory should now look like the following:

007 O365

4 Create the Office 365 Package in CM

In the Configuration Manager Console, create a new Package in the Software Library.

008 O365

Populate the following package information using the same source folder as above:

009 O365

Choose Standard program as the program type:

010 O365

Populated the following information about the standard program:

011 O365

Enter the corresponding requirements:

012 O365

On the Nomad Settings page, enable Nomad and set the desired Cache Priority:

013 O365

Confirm the information on the summary screen:

014 O365

Confirm the successful creation and click Close:

015 O365

Back in the console under Packages, right-click on the Office 365 package and select Create Program:

016 O365

Select Standard program:

017 O365

For the program name use Update Office 365 Cache with the command line: Install.bat /pre-cache:

018 O365

Use 1 GB for the estimated disk space and the same platform requirements as before:

019 O365

Confirm the information on the summary screen:

020 O365

Confirm the successful creation and click Close:

021 O365

5 Distribute the Package to the DP(s)

Back in the console under Packages, right-click on the Office 365 package, select Distribute Content:

022 O365

Review the selected content and click Next:

023 O365

Select the correct Distribution Points or Distribution Point Group:

024 O365

On the summary page confirm the settings and click Next:

025 O365

On the completion page, confirm success and click Close:

026 O365

6 Create the Office 365 Collection

Create the collection that will be used to deploy Office 365 and also update the local Office 365 cache. Depending on your preference and deployment strategy, two collections can be created instead of one. One can be for the initial deployment and the other can be for updating the Office 365 cache on a monthly, quarterly or as needed basis. For this purposes of this document, we will keep it simple and only create one collection.

In the CM console under Device Collections, right-click and select Create Device Collection:

027 O365

Give the collection the name Office 365 and select a corresponding limiting collection:

028 O365

Add a couple of test systems to the Office 365 collection that is being created:

029 O365

Confirm the settings on the summary page:

030 O365

On the completion page, confirm the successful completion and click Close:

031 O365

7 Create the Office 365 Installation Deployment

Now create the Deployment that will install Office 365 on systems that are in the collection that was just created in the previous step. In the console under Packages, right-click and select Deploy.

032 O365

Select Install Office 365 for the software and Office 365 for the collection:

033 O365

Verify that the content is on the required Distribution Points/Groups:

034 O365

On the Deployment Settings page, leave the Purpose set to Required for an unattended installation:

035 O365

Set the schedule and rerun behavior:

036 O365

Click Next on the User Experience:

037 O365

On the Distribution Points page, since we are using Nomad we can safely select Download content from distribution point and run locally for slow and unreliable network boundaries (which also includes undefined network boundaries). That is another benefit of Nomad is the fact that you do not need to ever worry about managing boundaries in order for it to work (unlike other solutions). In addition, enabled Allow clients to use a fallback source location for content (since with Nomad, you probably only have a couple of Distribution Points in the datacenter).

038 O365

On the Summary page, verify the settings and click Next:

039 O365

Verify that the Deploy Software Wizard completed successfully:

040 O365

8 Verify Installation

Logging onto PC01, we see using the Nomad Branch GUI that it is the master and is downloading the package from the CM Distribution Point:

041 O365

Whereas on PC02, it is pulling the Office 365 package from PC01 (notice the mode – SMB from Peer):

042 O365

Back in the CM console, we see that both installed successfully:

043 O365

Using fsutil, you can see that the files are only on the disk once and have multiple pointers (i.e. hard links). One points to the Nomad cache, one to the CM Cache and the last one to the Preload\Office365 directory:

044 O365

9 Create the Update Office 365 Cache Deployment

Now it is time to create the Update Office 365 Cache Deployment. Office 365 is updated on the second Tuesday of the month with updates and/or security patches. The process is combined, so there is currently no way to split out just the security updates. The version is displayed on the Account page of anyone of the Office applications. This is from the April 2015 release (version 15.0.4711.1002, which is the same as a subdirectory in our Office 365 package as seen above):

045 O365

The following knowledge base article lists all of the Office 365 updates: https://support.microsoft.com/en-us/gp/office-2013-365-update

The Office 365 package can be updated monthly, every other month, or quarterly depending on your company’s patching frequency. Keep in mind that each of the files change in the monthly download, so the majority of the files will need to be cached. Also, it is probably best to test them out on a pilot group prior to releasing them to the entire enterprise. This discussion goes beyond the subject of this article, but there is a version property that can be used in the configuration file.

In the CM Console under Packages, right-click on the Office 365 package and select Deploy:

032 O365

Select Update Office 365 Cache for the software and Office 365 for the collection:

047 O365

Verify that the content is on the required Distribution Points/Groups:

034 O365

On the Deployment Settings page, leave the Purpose set to Required for an unattended installation:

035 O365

Set the schedule and rerun behavior. Since this is just updating the Office 365 Cache, this example configures it to run on the third Tuesday of every month and the rerun behavior is set to Always rerun program:

050 O365

Click Next on the User Experience:

037 O365

Just like the Install Office 365 Deployment, on the Distribution Points page, since we are using Nomad we can safely select Download content from distribution point and run locally for slow and unreliable network boundaries (which also includes undefined network boundaries). That is another benefit of Nomad is the fact that you do not need to ever worry about managing boundaries in order for it to work (unlike other solutions). In addition, enabled Allow clients to use a fallback source location for content (since with Nomad, you probably only have a couple of Distribution Points in the datacenter).

038 O365

On the Summary page, verify the settings and click Next:

053 O365

Verify that the Deploy Software Wizard completed successfully:

054 O365

Now on the third Tuesday of every month, the clients will update their Office 365 cache with the latest binaries. Office 365 updates are done from a scheduled task on the local system and will be updated accordingly after the next cycle.

10 Summary

The above process outlines one method for deploying and updating Office 365 in a managed environment by leveraging the current investment in System Center 2012/R2 Configuration Manager and 1E Nomad. This process will overcome the challenges that were mentioned in the beginning of this article. It will allow companies to deploy and update Office 365 without causing negative impact to the corporate WAN links and Internet connections.  It can be used without Nomad, but then you lose the P2P functionality and intelligent bandwidth management when downloading from a DP.  So a word to the wise if you don’t use Nomad – be careful!!!!  Or better yet – head over to www.1e.com!

11 Reference Links

Office Deployment Tool for Click-to-Run

Deploy Click-to-Run for Office 365 products by using the Office Deployment Tool

Overview of the update process for Office 365 ProPlus

Managing Updates for Office 365 ProPlus – Part 1

Managing Updates for Office 365 ProPlus – Part 2

System Center 2012 R2 Configuration Manager

1E Nomad

Originally posted on https://miketerrill.net/


The Power of Power BI

$
0
0

I wanted a great way to present some Operating System data combined with Secure Boot States and BIOS break downs but was drawing a blank with Report Builder. Then I discovered a really powerful tool called Power BI. It not only lets you create great looking reports, but it also allows them to be interactive.

I started off by creating a nice looking donut with the different operating system versions using Power BI Desktop:

01 Operating Systems donut

Next, I added a pie chart for the Secure Boot State (see my previous post on Inventory Secure Boot State and UEFI with ConfigMgr on how to inventory this data with ConfigMgr):

02 Secure Boot State

Now for the interactive part – when I click on Microsoft Windows 7 Enterprise, the Secure Boot State shows that all of them are running BIOS (notice the dual color portion of the BIOS part of the chart):

03 Windows 7 - BIOS

Clicking on Microsoft Windows 10 Enterprise shows that all of those systems currently have Secure Boot State enabled:

04 Windows 10 Secure Boot On

Whereas on my Microsoft Windows 10 Enterprise 2015 LTSB system I have it turned off (since I only have one system and it is the only one reporting that Secure Boot is disabled the entire pie area darkened vs. only part of it when you have more than one system meeting that criteria):

05 Windows 10 LTSB Secure Boot Off

And with my two Microsoft Windows 8.1 Enterprise systems, one has Secure Boot enabled and the other running is still running BIOS:

06 Windows 8.1 Secure On and BIOS

As you can see, this is a powerful new way to look at data. Get started today by heading over to powerbi.microsoft.com and be sure to check out Ronnie Jakobsen’s post, of Coretech, on Hardware overview with Power BI.

Originally posted on http://miketerrill.net


How to Inventory HP BIOS and UEFI Settings with ConfigMgr

$
0
0

HP logo

When starting any operating system deployment project, it is a good idea to know what systems are in your environment so that you can determine which of these systems need to support the new OS. Some systems may need to be replaced, where as others might only need a BIOS UEFI update. It is also a good idea to standardize on the BIOS UEFI settings for each supported model in the environment. This ensures that consistent settings are used so that certain systems management features function correctly (for example, like wake-on-lan).

Now that Windows 10 is here, now is the time to standardize on native UEFI as the default boot mode. When making this switch, it is also important to enable Secure Boot at the same time. But, before you can do that, you need to determine not only what is in your environment, but how each system is configured.

You can inventory these hardware specific settings with System Center Configuration Manager. For the HP systems this is pretty simple and on newer models – this information is already stored in WMI and does not require anything to be installed on the clients for it to be enabled. The information is all stored in the HP Namespace: root/hp/instrumentedBIOS. In order to get this information into ConfigMgr, we need to add the classes to the Default Client Settings Hardware Inventory.

  1. Open the Default Client Settings, select Hardware Inventory and click the Set Classes button.
    01 Default Client Settings
  2. On the Hardware Inventory Classes window, click the Add button.
    02 Hardware Inventory Classes
  3. On the Add Hardware Inventory Class window, click the Connect button.
    03 Add Hardware Inventory Class
  4. If the system that is running the ConfigMgr Console is a HP, leave the pre-populated computer name. Otherwise type the computer name of a HP system that is current on the network. For the WMI namespace field, enter: root\hp\instrumentedBIOS and check the Recursive box. Enter credentials if connecting to a remote system and click the Connect button.
    04 Connect to Windows Management Instrumentation
  5. On the Add Hardware Inventory Class window, select the following two classes: HPBIOS_BIOSEnumeration and HPBIOS_BIOSOrderedList and click OK. This enables us to inventory BIOS UEFI settings (current and possible) and also the device boot order for Legacy Boot and UEFI Boot.
    05 Add Hardware Inventory Class
  6. Back on the Hardware Inventory Classes window, I recommend un-selecting the class for the Default Client Settings (in fact I recommend trimming the Default Client Hardware Inventory Classes down to just a few and target only the necessary classes via Custom Client Setting). We will add them to a Custom Client Settings designed for Workstations. Unselect HPBIOS_BIOSEnumeration and HPBIOS_BIOSOrderedList and click OK.
    06 Hardware Inventory Classes
  7. On the Default Settings window, click OK.
    07 Default Settings
  8. Next, create a Custom Client Device Settings, give it the name Workstation Client Settings, select Hardware Inventory.
    08 Create Custom Client Device Settings
  9. Click on Hardware Inventory in the left pane and click Set Classes.
    09 Create Custom Client Device Settings
  10. Expand HPBIOS_BIOSEnumeration and select the following fields: CurrentValue, DisplayInUI, IsReadOnly, Name, PossibleValues, Value (InstanceName gets selected by default). These are the fields that have useful information that we can use for reporting.
    10 Hardware Inventory Classes
  11. Next, expand HPBIOS_BIOSOrderedList and select the following fields: Name, Value (InstanceName gets selected by default) and click OK.
    11 Hardware Inventory Classes
  12. On the Create Custom Client Device Settings window, adjust the desired Hardware inventory schedule and click OK.
    12 Create Custom Client Device Settings
  13. Deploy the newly created Workstation Client Settings out to a collection that contains HP workstation systems. I have one called All Workstation Clients.
    13 Workstation Client Settings
  14. On a targeted HP system, kick off a Machine Policy Retrieval & Evaluation Cycle and then a Hardware Inventory Cycle. In the InventoryAgent.log on the client, you should find two entries being inventoried for the newly defined namespace.
    14 InventoryAgent log
    15 InventoryAgent log
  15. Back in the ConfigMgr Console, use the Resource Explorer and open up the Hardware inventory for the system that was used in the previous step. Here you will see that the two new classes and corresponding values have been added.
    16 Resource Explorer
    17 Resource Explorer
  16. This information can now be used to show which systems are UEFI capable for your Windows 10 project.
    18 UEFI capable

Hopefully you found this post useful and in an upcoming post I will show you how to modify HP BIOS UEFI settings using System Center Configuration Manager.

Originally posted on https://miketerrill.net/


Viewing all 78 articles
Browse latest View live